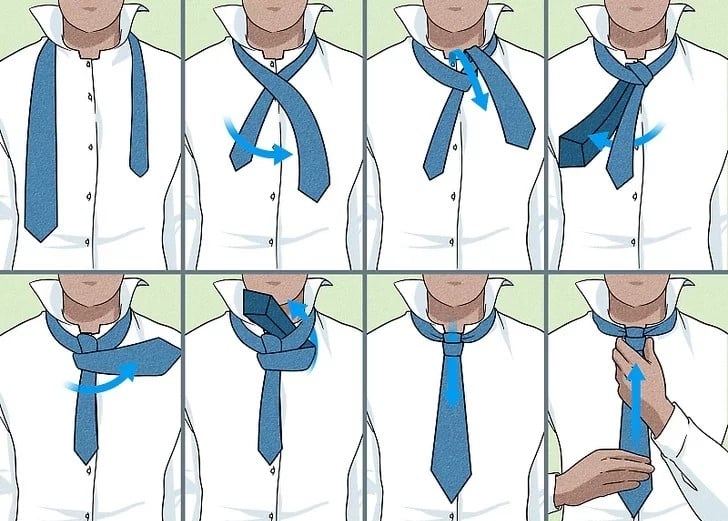
Here at Finesse Brides and Groom, we know, that only a few people now wear a suit on a regular basis. Keeping this in mind, here is our ‘How to tie a tie’ blog which will help those who only wear a suit once or twice a year with their Ties. Once you start wearing suits on a regular basis then this will become second nature.
First Step: Start by holding the tie around the back of your neck. The wider end of the
tie should be on your right and the narrow end should be on your
left side. The wide end should be longer than the narrow end by a few
inches.
Step 2: On the front cross the wide end of the tie over the narrow end, so that it’s
now on your left side.
Step 3: Bring the wide end of the tie behind the narrow end and back to
the right side.
Step 4: Cross the wide end of the tie over the narrow end a second time, so
that it’s now on your left side.
Step 5: Bring the wide end of the tie up and over the knot you’ve just
created, and then pull it down through the loop at the front of the
knot.
Step 6: Hold onto the knot with one hand, and use your other hand to
adjust the tie so that it’s snug against your neck and the knot is
centred.
Step 7: Take the wide end of the tie in your hand again, and bring it up
and over the knot, from left to right.
Step 8: Next, bring the wide end of the tie down through the loop at the
front of the knot again.
Step 9: Use your fingers to adjust the knot so that it’s symmetrical and
looks neat.
Final step: Finally, tuck the narrow end of the tie into your shirt if it is long enough and
adjust the knot once more if necessary.
Congratulations, you’ve successfully tied a tie! It may take some
practice to get it just right, but with a little patience, you’ll be
tying perfect knots in no time. If you have any questions then please contact us via email, phone or social media.
